If your facility is new to AMSHub but has been in operation, you probably have hundreds – or thousands – of items on your shelves that you’ll need to get into AMSHub. This is important as you’ll want to immediately start scanning these items into procedures, get automated reorder alerts, track expiration dates and much more. To facilitate this, we’ve built a tool specifically to help streamline the process of getting all of your existing inventory into the system using a bulk scanning and importing process.
There are a few steps involved in this process and we’ve outlined them below to help walk you through the process.
How To Import Existing Inventory
Since you’ll be scanning all of your disposables that could be located in multiple areas, we suggest you come up with an organized strategy for how you’ll work your way through your facility to scan everything in an orderly fashion. This will ensure nothing gets missed along the way and also provide you with enough structure to continue the import if you get interrupted for some reason.
Once you’ve got your strategy, you’re ready to get started:
Step 1 – Access Import Tool in AMSHub
You can start the import process by following the link from your Setup Checklist, or by going to Inventory and selecting the Barcode Import button.
Step 2 – Scan Items
When the Barcode Import tool loads, it’s ready to accept scanned barcodes.
Using a laptop or tablet connected to your barcode scanner and with the Import Tool loaded, begin scanning the barcodes of your items. We recommend the use of a laptop for simplest operation, but you can also use a tablet or a wireless scanner. Instructions provided here are for the recommended option of scanning with a laptop:
First, double-check your scanner for a few key features: ensure your scanner is adding a carriage return after each scan; ensure QR code scanning is enabled. See your scanner documentation for instruction on checking/enabling these features. You can also test your scanner by using the Scanner Test feature in AMSHub. Click on Help at the top of your screen, when logged in to AMSHub. Click on Scanner Test at the bottom of the drop down and follow the prompts on that page.
When you scan each barcode you’ll hear an audible sound from AMSHub providing feedback of the scan and the barcode content (you may also hear a beep from your actual barcode scanner which is not relevant beyond letting you know it read a barcode). AMSHub’s audible feedback tones will either be a double-beep success sound, or a buzz indicating there was an issue with the barcode data. If you hear the success sound, you can immediately scan the next barcode. Should you encounter the buzz tone, look at the screen in AMSHub as it will provide information to attempt at helping resolve the issue or alerting you that the item’s barcode is unusable. In some cases you’ll be prompted to scan another barcode, so follow the instructions as needed.
During this scanning process, AMSHub is testing each barcode to see if it has an acceptable format. If it does, it will get added to the import queue visible on the page. If the barcode format isn’t acceptable you’ll hear the buzz and follow the instructions, as noted above.
NOTES ON SCANNING:
For items that are in unopened boxes, scanning the box will add all of the items inside the box to your inventory automatically. For instance, scanning a box containing 10 items will add all 10 items to inventory with the single scan. If you have a box that’s been opened, we recommend scanning all of the individual items inside the box in case items have been replaced in the box with others from other Lots or with alternate Expiration Dates, or in case some items have been used and there are fewer items than were originally included in the box.
Take a minute to educate yourself on some basic barcode details. Spending a few minutes of time learning more about what you’re scanning will potentially save you hours of future time with scanning.
Step 3 – Import
Once you’ve completed the scanning of all items, you can use the Import button at the bottom of the page to engage AMSHub’s Import engine. This process will start work on processing all of the item data received, working to identify and classify your items, and place them into your inventory in AMSHub for use. When the Import process is complete you will get a report outlining successful imports and indicating any potential issues.
For items we’ve successfully imported, some will go directly into your inventory. Others may go into a pending status while our team works to ensure the data is complete and accurate, and will automatically update in your inventory once it has been verified.
AMSHub automatically saves your progress. Should you get disconnected from your network, get called away for other business, returning to the import process will pick up where you left off. We recommend you continue to scan items until complete and not rely on this however.
Step 4 – Define Item Attributes
Once items have been added to AMSHub, you can now use the main Inventory page to quickly update each item’s attributes. These include high and low par, price and consignment status. It’s very important to set par and price information specifically. This data is used immediately to automatically generate orders, and to analyze profitability, case costing and much more. You can bulk edit price and par levels using the Edit All feature provided on the Inventory List page: click Edit All, make changes to all items, and click Done to save your changes. To edit consignment status, go into the specific item and edit it to select the consignment checkbox and Update.
Alternate Inventory Import Option (Old Version)
This process was dramatically improved and replaced with the development of our new Import Tool within AMSHub. We strongly encourage you to use it using the process above. If for some reason that isn’t possible, you can follow the modified version of the old process listed here.
Step 1 – Scan Items
For this first step you’ll use a laptop or tablet along with your barcode scanner to capture the barcode data for your existing items. We recommend the use of a laptop for simplest operation, but you can also use a tablet or a wireless scanner with built-in memory. Instructions provided here are for the recommended option of scanning with a laptop:
First, double-check your scanner for a few key features: ensure your scanner is adding a carriage return after each scan; ensure QR code scanning is enabled (see your scanner documentation for instruction on checking/enabling these features).
Open Notepad or another basic text editing program on your computer.
Scan the barcode of each item and ensure a string of numbers (and potentially letters) are added to the text file. Each scan should result in one line being added and your cursor automatically going to the next line. You will have one line per item in the text file

Please review our Barcodes 101 page to learn more about the structure of barcodes so you can quickly determine if you’re scanning the correct barcode. For valid barcode data, your file will look something like this:
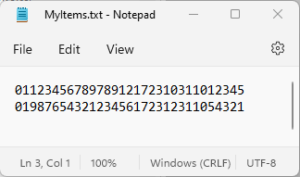
Each of those lines represents one item scanned, so this file is showing two different items that have been scanned from your shelves to be imported. There are a few unique vendors that in some cases use two barcodes to capture all of the product information normally included in one barcode. For more information about this and other barcode details, again, please see our Barcodes 101 page.
Save the file periodically throughout this exercise.
Step 2 – Upload
This feature is no longer available with the release of the new Import Tool. If you’ve created a file for import please email it to support@archermedicalsystems.com along with your facility name, and your request to have the inventory data imported manually.
Login to AMSHub and select Setup Checklist from left navigation. Go to Task 7 and click the Import Inventory Now button.
Click the Select Barcodes File… button and navigate to the text file created in Step 1
The import feature will analyze the content of your file to check for validity of the file itself and the data inside the file. All compatible data will be imported into your account. Where there are formatting issues AMSHub’s tools cannot understand, AMSHub will report back with issues and provide basic guidance to assist with resolution.

Step 3 – Resolve Issues
 There is a tremendous amount of logic built into the AMSHub inventory import tool that will attempt numerous ways to import the data you have provided. In some cases, there could be data in the file you upload that we simply cannot understand. This could be due to a number of factors such as scanning a barcode that contains bad data, a vendor who has non-compliant barcodes, etc. The Import tool will alert you to items we aren’t able to import and provide as much information as we can as to the reason. You can download the data the system was unable to import and clean it up and re-import the items with issues in an attempt to get the remaining products into the system.
For items we’ve successfully imported, some will go directly into your inventory. Others may go into a pending status while our team works to ensure the data is complete and accurate, and will automatically update in your inventory once it has been verified.
Step 4 – Define Item Attributes
Once items have been added to AMSHub, you can now use the main Inventory page to quickly update each item’s attributes. These include high and low par, price and consignment status. It’s important to set par and price information specifically. You can bulk edit this information using the Edit All feature provided on the Inventory List page: click Edit All, make changes to all items, and click Done to save your changes.
Please note that the Import feature is only available for use to load existing inventory to get your facility started on AMSHub. Once you begin using AMSHub to manage your facility by generating orders and adding procedures, this feature will no longer be available.